
Introduction
In this post, we’ll cover the basics of using the git source control system, which has emerged as the dominant tool in this space (especially since Microsoft paid $7.5B for github.com).
Audience
This workshop is intended for developers who are already aware what a source control system is and why you need it.
Platforms
We’ll do this workshop on Ubuntu, but git itself is completely cross-platform, so everything in this workshop is applicable for other platforms such as macOS and Windows. There are various GUIs available, but we’ll concentrate on the command line, since that’s what you should learn first. Many IDEs and editors (like VSCode) have git support built in, but it’s still important to be comfortable with the git command-line.
Installing git
$ sudo apt install git
Note: on macOS, git is preinstalled and on Windows you can install it from https://git-scm.com
Creating a repository
The first thing to note is that, unlike previous generations of source-control systems, git does not require a server – it creates its local repositories inside hidden folders (.git) in your project folder.
We’ll start by creating a “git-workshop” folder which we’ll use to hold our example project.
$ mkdir git-workshop
$ cd git-workshop
We’ll create a single index.html to represent our project source files.
$ echo "hello world" > index.html
Now we’ll create a new git repository:
$ git init
Initialized empty Git repository in /home/administrator/git-workshop/.git/
Now we’ll check the status of the git repository with:
$ git status
On branch master

Initial commit

Untracked files:
  (use "git add ..." to include in what will be committed)

	index.html

nothing added to commit but untracked files present (use "git add" to track)
This tells us that index.html is untracked – i.e. hasn’t yet been added to the repository, so lets add it. We use “git add .” to tell git to add all files in the current directory to the git repository.
Adding files to the repository
git calls this “staging” files. When a file has been added to a git repository its considered to be in the staging area.
$ git add .
Now lets check the status again:
$ git status
On branch master

Initial commit

Changes to be committed:
  (use "git rm --cached ..." to unstage)

	new file:   index.html
Now we see that the files are “staged”, which means that git knows about them. We still need to commit them to create a version of the file in the repository, so lets go ahead and do that with the “git commit” command:
Committing versions of your files
$ git commit -m "initial commit"

*** Please tell me who you are.

Run

  git config --global user.email "you@example.com"
  git config --global user.name "Your Name"

to set your account's default identity.
Omit --global to set the identity only in this repository.

fatal: unable to auto-detect email address (got 'administrator@test.(none)')
OK, git needs some additional configuration before the first commit, so lets do that:
$ git config --global user.email "roger@armstrongconsulting.com"
$ git config --global user.name "Roger Armstrong"
Now we’re ready to commit our project files to the repository.
$ git commit -m "initial commit"
[master (root-commit) c96d8b8] initial commit
 1 file changed, 1 insertion(+)
 create mode 100644 index.html
That’s better, now git has committed index.html to the repository.
If we now do a git status:
$ git status
On branch master
nothing to commit, working directory clean
We can see that everything has been committed to the repository. So if we now make a change to index.html, we would expect to have one version of the file in our directory and another, older, version in the repository. Let’s go ahead and do that.
echo "goodbye world" > index.html
and check with git status:
$ git status
On branch master
Changes not staged for commit:
  (use "git add ..." to update what will be committed)
  (use "git checkout -- ..." to discard changes in working directory)

	modified:   index.html

no changes added to commit (use "git add" and/or "git commit -a")
We can see that git knows that we’ve modified index.html. git will also tell us what has changed if we use git diff:
$ git diff
diff --git a/index.html b/index.html
index 1e3a238..eeee2af 100644
--- a/index.html
+++ b/index.html
@@ -1 +1 @@
-hello world
+goodbye world
OK, lets commit the changed version of index.html to the repository:
$ git add index.html
$ git commit -m "second commit"
[master e0f5746] second commit
 1 file changed, 1 insertion(+), 1 deletion(-)
Note that we gain had to add index.html. This seems a little counter-intuitive, but it’s the way git works – each version of a file must be added and then committed.
We can now get a history of our index.html file with git log:
$ git log index.html
commit e0f574641096ff683c81e740900c1582fbc0a724
Author: Roger Armstrong
Date:   Thu Nov 22 15:53:10 2018 +0100

    second commit

commit c96d8b8a75bb97d51610fb16d289965699519d24
Author: Roger Armstrong
Date:   Thu Nov 22 15:45:57 2018 +0100

    initial commit
Rolling back changes
One of the reasons why you need git is in order to be able to revert to a previous version of your project when you realise that the changes you’re currently making are going nowhere.
Lets first make a change to index.html.
echo "goodbye world!!!!!!!" > index.html
In a real project, we may have been working for hours and have made many changes, which we now regret and wish to roll back. There are several ways to do this with git, but the simplest one just gets us the latest committed version back again as follows:
$ git checkout -- *
Lets check that our changes have been rolled back:
$ more index.html
goodbye world
Looks good!
Removing files
If you want to remove a file from the repository (“unstage” it), you can do it with git rm .
Deleting the git repository
You can also delete the whole repository simply by removing the .git folder (“$ rm -rf .git”). If you do that, you’ll need to start over again with git init.
Recap
So we’ve learnt that git creates a local repository in a “.git” subfolder when you type “git init”. We’ve also covered adding and committing files to the repository and reverting to a previously committed version.
Until now, you’re working alone with a local repository – this covers your own needs for maintaining versions as you work. However, the real power of version control is when you are working with other people on a project. In the next section we’ll therefore cover remote repositories.
Remote repositories
git supports multiple levels of repositories. Usually, a project will have local repositories on each of the developer’s machines and a central, main repository which holds the contributions of all the developers involved in the project.
This central repository may be in the cloud (like github.com) or it may be privately hosted by a company. For the purposes of this workshop, we’ll use github.com as remote repository.
I logged onto my account on github.com and created a repository called “rogerarmstrong/git-workshop”. Github helpfully gave me a list of onscreen instructions for setting this up as a remote repository for my project. I need two steps “git remote add” and “git push” as shown below:
$ git remote add origin https://github.com/rogerarmstrong/git-workshop.git
$ git push -u origin master
Username for 'https://github.com': rogerarmstrong
Password for 'https://rogerarmstrong@github.com':
Counting objects: 6, done.
Compressing objects: 100% (2/2), done.
Writing objects: 100% (6/6), 482 bytes | 0 bytes/s, done.
Total 6 (delta 0), reused 0 (delta 0)
remote:
remote: Create a pull request for 'master' on GitHub by visiting:
remote:      https://github.com/rogerarmstrong/git-workshop/pull/new/master
remote:
To https://github.com/rogerarmstrong/git-workshop.git
 * [new branch]      master -> master
Branch master set up to track remote branch master from origin.
So now my project is committed to both the local git repository and to the remote repository at github.com. New members of the project team can now do a “git clone https://github.com/rogerarmstrong/git-workshop.git” to start working on the project. This one line will initialise a local repository and get the latest project files from the central repository in a single step.
If you want to change the remote repo, you’ll need to do a “git remote remove origin” and then a “git remote add origin …” with the new remote.
Working with the remote repository
We continue committing to the local repository as before and when we are ready to publish our changes to the rest of the project team, we push our changes to the remote repository.
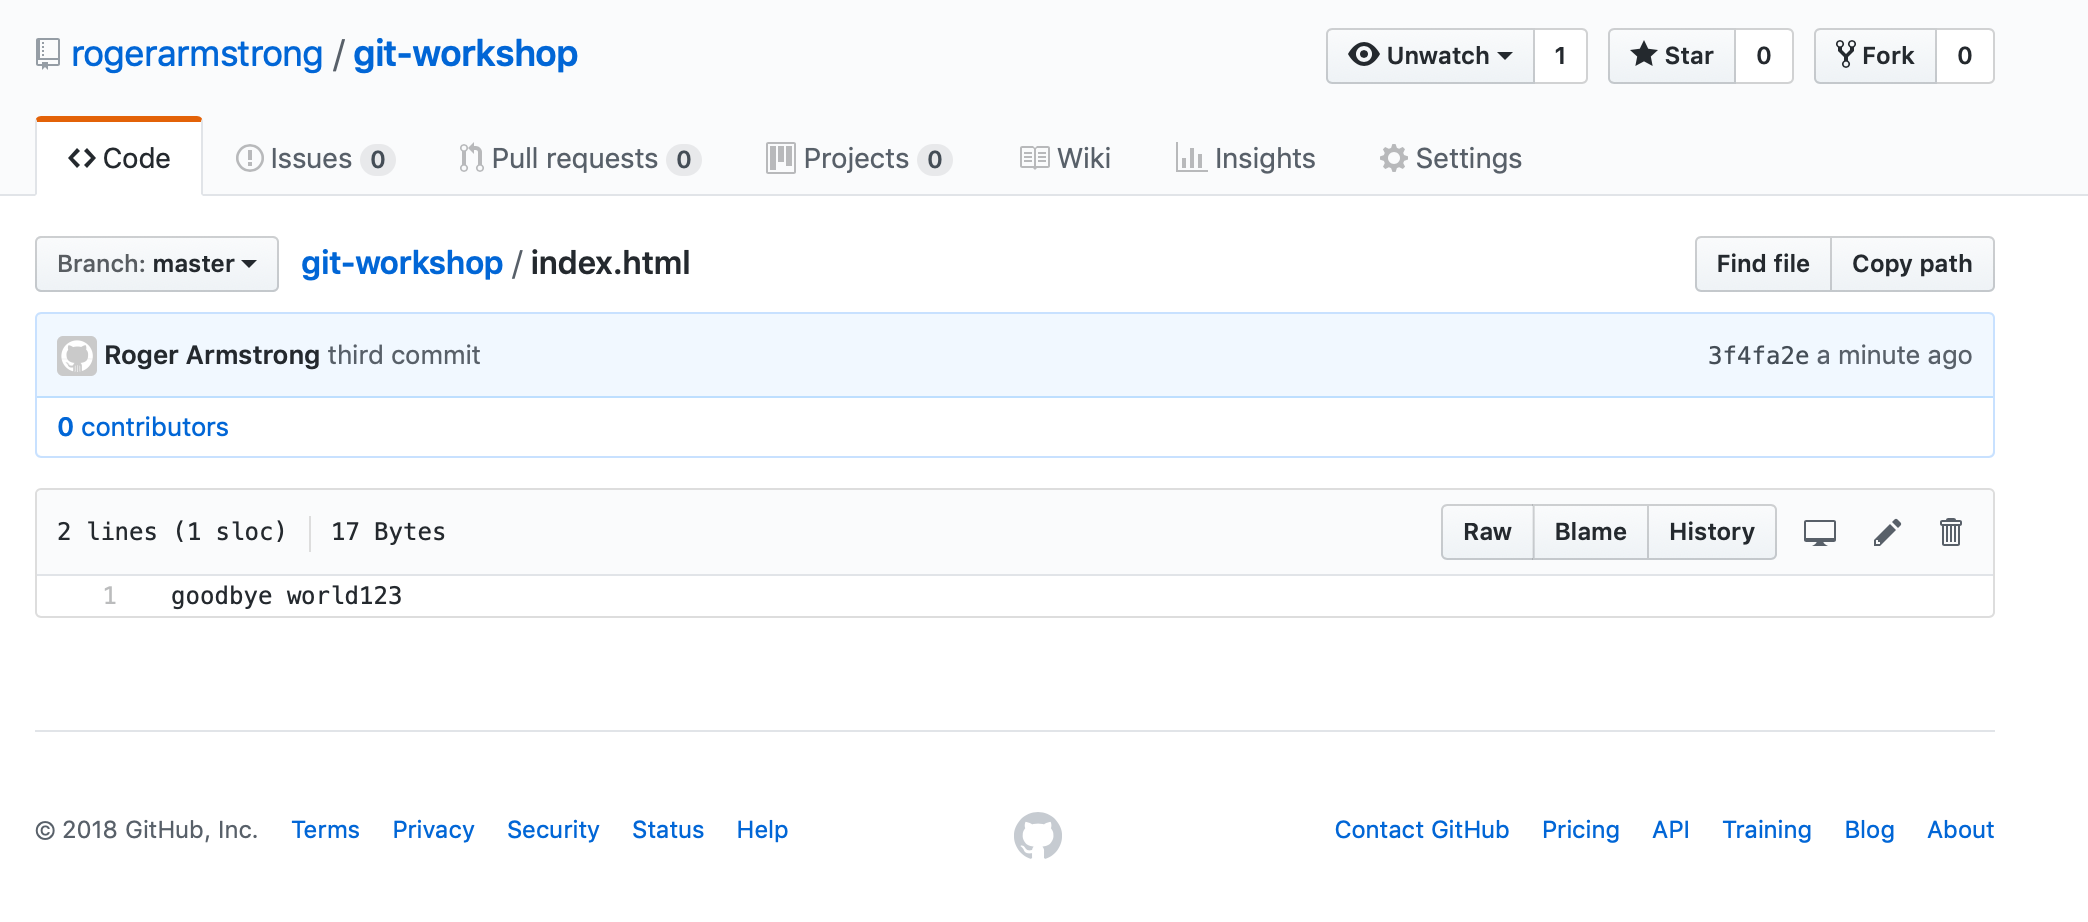
$ echo "goodbye world123" > index.html

$ git add index.html

$ git commit -m "third commit"
[master 3f4fa2e] third commit
 1 file changed, 1 insertion(+), 1 deletion(-)

$ git push origin HEAD:master
Username for 'https://github.com': rogerarmstrong
Password for 'https://rogerarmstrong@github.com':
Counting objects: 3, done.
Writing objects: 100% (3/3), 268 bytes | 0 bytes/s, done.
Total 3 (delta 0), reused 0 (delta 0)
To https://github.com/rogerarmstrong/git-workshop.git
   e0f5746..3f4fa2e  HEAD -> master
We can double-check online that our changes have been pushed out to the remote repository by looking at the file online at github.com:
To get changes pushed to the remote repository by other developers, we need to do a “git pull”:
$ git pull
remote: Enumerating objects: 5, done.
remote: Counting objects: 100% (5/5), done.
remote: Total 3 (delta 0), reused 0 (delta 0), pack-reused 0
Unpacking objects: 100% (3/3), done.
From https://github.com/rogerarmstrong/git-workshop
   fa8d55f..523fbda  master     -> origin/master
Updating fa8d55f..523fbda
Fast-forward
 index.html | 2 +-
 1 file changed, 1 insertion(+), 1 deletion(-)

$ more index.html
changed in the remote repository
Branching
Branching allows you to commit to a separate path than the main (“master”) development. This means that you can continue to commit your changes, but they won’t affect team members who are working on the master or another branch. Below we create a branch called “experimental”:
$ git checkout -b experimental
If we now do a git status, we’ll see that we are on the branch “experimental”.
$ git status
On branch experimental
nothing to commit, working directory clean
If we now make a change to index.html and commit it, it’ll be committed to the “experimental” branch.
$ echo "an experiment" > index.html

$ git add index.html

$ git commit -m "first commit on this branch"
[experimental fa8d55f] first commit on this branch
 1 file changed, 1 insertion(+), 1 deletion(-)
We can now switch back and forward between “experimental” and master branches:
$ git checkout master
Switched to branch 'master'
Your branch is up-to-date with 'origin/master'.

$ more index.html
goodbye world123

$ git checkout experimental
Switched to branch 'experimental'

$ more index.html
an experiment
We can see all branches with:
$ git branch
* experimental
  master
If we now decide we like the experimental branch and want to merge it into the master:
$ git checkout master
Switched to branch 'master'
Your branch is up-to-date with 'origin/master'.

$ git merge experimental
Updating 42cd059..fa8d55f
Fast-forward
 index.html | 2 +-
 1 file changed, 1 insertion(+), 1 deletion(-)

$ more index.html
an experiment
Finally, we can delete the experimental branch:
$ git branch -d experimental
Deleted branch experimental (was fa8d55f).

$ git branch
* master
Summary
Thats it for now. We hope you enjoyed our basic introduction to git. We have covered how to create a local git repository, how to add and commit files to it, how to create a remote repository and push changes out to it and pull changes from it and finally how to create branches. git has many more commands to deal with the complexities of real-world projects such as conflict resolution (during merging of changes from multiple developers) – we’ll leave you to explore these more advanced topics for yourself. Have fun!