Mongo vs Postgres as simple JSON object store
We needed a JSON document store for a microservice. The documents are relatively large, about 1MB, and they should be retrieved by id. Mongo and Postgres are the obvious candidates… Read more »

We needed a JSON document store for a microservice. The documents are relatively large, about 1MB, and they should be retrieved by id. Mongo and Postgres are the obvious candidates… Read more »

We have been happily using Postgres-BDR for years as a multi-master database for fault-tolerant applications – it’s been incredibly robust for us. The advantage of a multi-master database is that… Read more »

I bought my first house at the start of the COVID-19 pandemic. Having been built in the early 70’s, it was going to need a lot of work to bring… Read more »
When we’re creating an API with fault-tolerance, to reduce the number of single points of failure, we often use Postgres BDR, a multi-master database, which allows us to provide two… Read more »
Using VCenter’s migration over the internet to a remote data-center is often too slow for practical purposes – a 200GB VM may take several hours to move and that may… Read more »
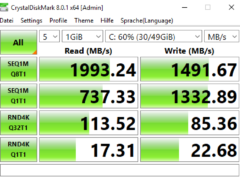
Here are some disk performance measurements (made on a Windows 10 VM on vSphere 6.5 with CrystalDiskMark) across different types of datastore (local SSD array, NFS (sync), NFS (async) and… Read more »

To celebrate the successful first year of Powerbot, the algorithmic energy trading company, we decided to build a Powerbot robot which could continuously monitor the status of the Powerbot APIs…. Read more »

Sometimes you need to block access to a specific ip address for test purposes – for instance to simulate unavailability of a web-service. Here’s how to do it on macOS… Read more »

If you have created a container without specifying a volume, Docker will create one for you. If you later decide you’d rather have the container’s data somewhere else, you can… Read more »

Postgres-BDR is an excellent multi-master replication clustering extension for PostgreSQL (https://www.2ndquadrant.com/en/resources/postgres-bdr-2ndquadrant/). We often use it for fault tolerant systems – its asynchronous and uncomplicated to set up (at least if… Read more »