
Introduction
Matthias & Jakob have just joined the team at Armstrong Consulting. As part of the learning process, they get to design & develop a complete application from start to finish using the technology stack they’ll be using on customer projects. In this post, they describe their work.
To familiarize ourselves with all the technologies we will be using day-to-day for customers, we wanted to create an application using as many relevant patterns as possible as an exercise. The application should be based around a stateless microservice REST API, encapsulating application logic (user signon etc.) and other external REST APIs (TMDb, Plex). In this post we are going to outline the steps to develop that application.
Our plan was to create a web application that allows us to conveniently browse movies we get from the TMDb API while also adding our own features (such as synchronisation with a user’s Plex library) on top of that by passing all the requests through our own API.
You can visit the finished application here.

Technology stack:
- Java
- Spring Boot (server framework)
- Typescript, HTML, CSS
- Angular (web application)
- Docker, Docker Compose (containerization, deployment)
- HAProxy (routing, load balancing and fault tolerance)
- Oracle
Implementing a REST API with Spring Boot
Planning to create a full functioning REST API in Java can be intimidating, but tools like Spring Boot help to make it easier. Spring Boot provides a way to publish RESTful APIs with Spring MVC, and it also allows us to conveniently access a database of our choice with Spring Data and Hibernate as well as providing a security framework with Spring Security to authenticate the users accessing our API.
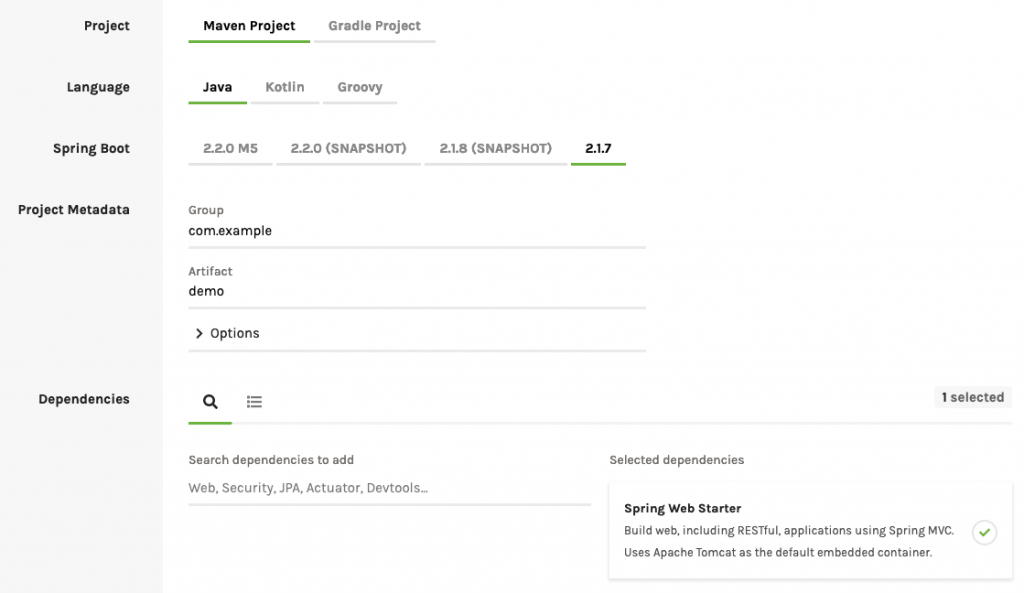
Step 1: Getting the tools
In order to start a project with Spring Boot we make use of the Spring Initializr. It provides an easy to use UI to configure and generate the project according to our needs with all the necessary dependencies. We used a Maven Project with the latest version of Spring and include the Spring Web Starter dependency. Additionally, we are going to use Eclipse IDE (but feel free to use your preferred IDE as we are not relying on any exclusive features of Eclipse).
Step 2: Creating a REST Controller to handle API requests
Before creating the controller, let’s see what we have so far: Since we already have Spring Web Starter in our dependencies, Spring will automatically start a tomcat server on the default port 8080 once we launch the application. If you want to change the port, just go into your src/main/resources/application.properties file and change the port to whatever you need.
# Configure server port
server.port=8080
You can easily start the server using the IDE of your choice or from the command line in your project directory with the command$ mvn spring-boot:run
Now you can already browse to http://localhost:8080 and are going be greeted by an error page:

Since we don’t have a controller to handle our request yet, Spring responds with its default error controller. So let’s go ahead and create a controller:
All we have to do is to create a new class and annotate it with Spring’s built in annotation @RestController.
@RestController
public class MyRestController {

}
Now we can declare as many methods on the controller as we like, and those we annotate with @GetMapping(value=”/api-path”) will automatically be called once a GET request to the specified path is made. Similarly we would use @PostMapping for POST requests and so on…
@RestController
public class MyRestController {

	@GetMapping(value="/ping")
	public String ping() {
		return "pong";
	}

}
As you can see in the example above, we declare a method with a return type of type String. Once our method returns, Spring automatically sets a Content-Type header of text/plain, sets a http status code of 200
and off goes the response. Spring does all of this for us, but we can
manipulate the request as well as the response directly if we choose so.
Just tell spring to give us the request and response objects by
declaring them as parameters of our method.
@GetMapping(value="/ping")
public String ping(HttpServletRequest request, HttpServletResponse response) {
    response.setContentType("text/plain;charset=UTF-8");
    response.setStatus(HttpServletResponse.SC_OK);
    return "pong";
}
This comes in handy, especially when you want to return a specific status code other then 200,
or want to access the request headers for example. Luckily, we are not
limited to returning Strings from our methods and we can choose to
return objects as well. Spring will automatically convert the object to
JSON and set the appropriate Content-Type header.
public class PongMessage {
	private String message;

	public PongMessage(String message) {
		this.message = message;
	}
	public String getMessage() {
		return message;
	}
	public void setMessage(String message) {
		this.message = message;
	}
}
@GetMapping(value="/ping")
public PongMessage ping() {
return new PongMessage("pong");
}As you would expect, the response from this method is {"message":"pong"}.
One of the last important features we frequently use throughout our
controllers, is the convenient handling of path variables and request
parameters. Spring provides two annotations @PathVariable and @RequestParam(value=”name”, defaultValue=”default”)
for that purpose. Simply give the method a parameter, annotate it
accordingly, and it will receive the value, once a request is made.
@GetMapping(value="/ping/{pathVar}")
public PongMessage ping(@PathVariable Long pathVar, @RequestParam(value="param", defaultValue="defaultParam") String param) {
    return new PongMessage(String.format("pong: %d, %s", pathVar, param));
}
This approach of creating our API is known as “API-Second” approach, which means that we are implementing the methods first before assigning them to a specific path of our API. This may not be the best way to go for designing APIs but as our whole project and its requirements evolved in some way, it was the way that suited our immediate needs best.
Step 3: Create a User Database Model
Now that we are able to handle requests to our API, we want the
possibility to create a user, store all of its properties in a database
and modify these properties once we created it. For this purpose we need
to include the Spring Data dependency in the pom.xml file.
<dependency>
    <groupId>org.springframework.boot</groupId>
    <artifactId>spring-boot-starter-data-jpa</artifactId>
</dependency>
In order to achieve the behaviour mentioned above, we first create a model of the user, a class basically, that we have to annotate accordingly with the annotations provided by the JPA. We can now choose which properties we want to be represented by a column, what the column should be named or if the property should be unique for example. Eventually Spring Data will create a new table from our user model, so everything we can configure a SQL table to look and behave like, we can do with our model as well.
@Entity
public class MovieUser {
	@Column(name = "username", unique = true, nullable = false)
	private String username;

	@Column(name = "password")
	private String password;

	@Id
	@GeneratedValue(strategy = GenerationType.IDENTITY)
	private Long id;

	public MovieUser() {}

	public MovieUser(String username, String password) {
		setUsername(username);
		setPassword(password);
	}

	public String getUsername() {
		return username;
	}

	public void setUsername(String username) {
		this.username = username;
	}

	public String getPassword() {
		return password;
	}

	public void setPassword(String password) {
		this.password = password;
	}

	// we don't need a setter for id as it is auto generated
	public Long getId() {
		return id;
	}
}
As we want the ability to store the created model in a database, we extend Springs JpaRepository interface with our own interface MovieUserRepository and annotate it with @Repository.
Through this repository we can tell Spring by which properties we want
to be able to select and find users in the database. As long as we
provide the right method signature, Spring will magically implement the
methods to work as intended.
@Repository
public interface MovieUserRepository extends JpaRepository<MovieUser, Long>{
	MovieUser findByUsername(String username);
}
Now, as we obviously cannot instantiate interfaces and instead want
spring to implement the methods of our repository, we make use of a
service that handles database interactions for us. Thus, we create a
class, annotate it with @Service and autowire an instance of the MovieUserRepository (implemented by Spring) into it by using one of Springs powerful annotations @Autowired. Spring will inject the MovieUserRepository
at runtime. All we have to do now is to create some methods to act on
our repository which will then further interact with the database.
Methods that save or delete Users from our database additionally need to
be annotated with @Transactional.
@Service
public class MovieUserService {

	@Autowired
	MovieUserRepository movieUserRepository;

	@Transactional
	public void saveUser(MovieUser user) {
		movieUserRepository.save(user);
	}

	public MovieUser getMovieUserByUsername(String username) {
		return movieUserRepository.findByUsername(username);
	}
}
In order to get all of this to work, we still need to tell Spring how to
connect to our database. We do this by setting some properties in the application.properties
file. Apart from url, username and password we give Spring the driver
of our database. It is important to add the driver as dependency to our pom.xml, otherwise Spring doesn’t know where to look for it. As we are using an oracle database, this is the driver we need to include:
<dependency>
    <groupId>com.oracle</groupId>
    <artifactId>ojdbc6</artifactId>
    <version>11.2.0.2.0</version>
</dependency>
In addition, we need to tell Spring to update the database, based on our model, and create a table for it.
# Configure server port
server.port=8080

# Database settings
spring.datasource.url=
spring.datasource.username=
spring.datasource.password=
spring.datasource.driver.class=oracle.jdbc.driver.OracleDriver

spring.jpa.hibernate.ddl-auto=update
As you can see, by using Spring Data we are completely disconnected from any specifics of different databases and could easily switch between databases just by providing a corresponding driver.
To finally see all of this in action, let’s add a signUp() method to our REST controller and map it to a POST request on “/account”. In order to interact with the database we need access to the MovieUserService inside the controller. We achieve this by autowiring the service into the controller by annotating it with @Autowired. Additionally, we create a new SignupResponse model so we can return a useful message alongside a property success, which indicates, if the operation was successful or not.
public class SignupResponse {
	private String message;
	private boolean success;

	public SignupResponse(String message, boolean success) {
		super();
		this.message = message;
		this.success = success;
	}

	public String getMessage() {
		return message;
	}

	public void setMessage(String message) {
		this.message = message;
	}

	public boolean isSuccess() {
		return success;
	}

	public void setSuccess(boolean success) {
		this.success = success;
	}
}
The controller now looks like this:
@RestController
public class MyRestController {

	@Autowired
	MovieUserService movieUserService;

	@GetMapping(value="/ping")
	public String ping() {
		return "pong";
	}

	@PostMapping(value="/account")
	public SignupResponse postAccount(HttpServletResponse response, @RequestParam(value="username") String username, @RequestParam(value="password") String password) {
		try {
			movieUserService.saveUser(new MovieUser(username, password));
			return new SignupResponse("Account was successfully created.", true);
		} catch(Exception e) {
			response.setStatus(HttpServletResponse.SC_INTERNAL_SERVER_ERROR);
			return new SignupResponse("An error occoured while creating your account.", false);
		}
	}
}
Even though the implementation above already works, it still needs some improvements, such as checking if the parameters username and password are empty or match a specific pattern, if the user already exists in the database as well as better exception handling. But as this is not a very Spring related matter, it is left to you to hammer out the details to match your requirements.
Step 4: Adding Authentication
In order to implement authentication for our users, we found JWT tokens to meet our requirements. Authentication via JWT is not only an industry standard, but it allows our API to be stateless as well. The behaviour we want is as follows: A user retrieves a JWT token by providing his username and password. From now on, all requests to the API he makes include a header with the token. Thus every request handler of our API cannot only be sure that the request is indeed made by an authorized user, it can retrieve the username from the token as well.
We achieve all of this by adding Spring Security to our project dependencies and customizing some of its configurations as well as adding some filters to handle the JWT tokens.
<dependency>
    <groupId>org.springframework.boot</groupId>
    <artifactId>spring-boot-starter-security</artifactId>
</dependency>
First, we need to extend Springs WebSecurityConfigurerAdapter to create our custom SecurityConfiguration
class. Here, we can configure which filters we want to apply to which
requests, as well as some other security related settings such as CORS
handling.
@EnableWebSecurity
@EnableGlobalMethodSecurity(securedEnabled = true)
public class SecurityConfiguration extends WebSecurityConfigurerAdapter{
	@Autowired
	private CustomAuthenticationProvider customAuthenticationProvider;

	@Override
	protected void configure(HttpSecurity http) throws Exception {
		http.cors().and().csrf().disable().authorizeRequests().antMatchers("POST", "/account").permitAll()
				.anyRequest().authenticated().and().addFilter(new JwtAuthenticationFilter(authenticationManager()))
				.addFilter(new JwtAuthorizationFilter(authenticationManager())).sessionManagement()
				.sessionCreationPolicy(SessionCreationPolicy.STATELESS);
	}

	public void configure(AuthenticationManagerBuilder auth) throws Exception {
		auth.authenticationProvider(customAuthenticationProvider);
	}

	@Bean
	public CorsConfigurationSource corsConfigurationSource() {
		CorsConfiguration configuration = new CorsConfiguration();
		configuration.setAllowedMethods(Arrays.asList("GET", "POST", "PUT", "DELETE"));
		UrlBasedCorsConfigurationSource source = new UrlBasedCorsConfigurationSource();
		source.registerCorsConfiguration("/**", configuration.applyPermitDefaultValues());
		return source;
	}
}
Furthermore, we provide a CustomAuthenticationProvider which extends Springs AuthenticationProvider to manually check if the credentials a user wants to authenticate with, match the ones stored in the database.
@Component
public class CustomAuthenticationProvider implements AuthenticationProvider {

	@Autowired
	private MovieUserService movieUserService;

	@Override
	public Authentication authenticate(Authentication authentication) throws AuthenticationException {
		String username = authentication.getName();
		String password = authentication.getCredentials() == null ? null : authentication.getCredentials().toString();

		if(username == null || password == null) {
			return null;
		}

		try {
			MovieUser user = movieUserService.getMovieUserByUsername(username);
			if(user.getPassword().equals(password)) {
				return new UsernamePasswordAuthenticationToken(username,
						password, new ArrayList<>());
			}
		} catch(Exception e) {
			// user does not exist in db
		}
		return null;
	}

	@Override
	public boolean supports(Class<?> authentication) {
		return authentication.equals(UsernamePasswordAuthenticationToken.class);
	}

}
To finally get to the JWT token handling, let’s look at two filters we declare: At first, let’s declare a few constants we are going to use.
public final class SecurityConstants {

	public static final String AUTH_LOGIN_URL = "/account/token";

	public static final String JWT_SECRET = "n2r5u8x/A%D*G-KaPdSgVkYp3s6v9y$B&E(H+MbQeThWmZq4t7w!z%C*F-J@NcRf";

	// JWT token defaults
	public static final String TOKEN_HEADER = "Authorization";
	public static final String TOKEN_PREFIX = "Bearer ";
	public static final String TOKEN_TYPE = "JWT";
	public static final String TOKEN_ISSUER = "secure-api";
	public static final String TOKEN_AUDIENCE = "secure-app";

	private SecurityConstants() {
		throw new IllegalStateException("Cannot create instance of static util class");
	}
}
And add the libraries we are using for generating and parsing JWT tokens.
<dependency>
    <groupId>io.jsonwebtoken</groupId>
    <artifactId>jjwt-api</artifactId>
    <version>0.10.5</version>
</dependency>
<dependency>
    <groupId>io.jsonwebtoken</groupId>
    <artifactId>jjwt-impl</artifactId>
    <version>0.10.5</version>
    <scope>runtime</scope>
</dependency>
<dependency>
    <groupId>io.jsonwebtoken</groupId>
    <artifactId>jjwt-jackson</artifactId>
    <version>0.10.5</version>
    <scope>runtime</scope>
</dependency>
Now we are going to create the JwtAuthenticationFilter which extends Springs UsernamePasswordAuthenticationFilter.
This filter is given a specific URL and method to filter on, so
whenever a user wants to receive a JWT by sending a request with his
username and password to this URL, the filter attempts to authenticate
the user by calling the attemptAuthentication() method.
Depending on whether the authentication succeeds or not, it calls the
appropriate methods to handle the situation. If the authentication is
successful it then generates the JWT token and returns it in the
response.
public class JwtAuthenticationFilter extends UsernamePasswordAuthenticationFilter{

	private final AuthenticationManager authenticationManager;

	public JwtAuthenticationFilter(AuthenticationManager authenticationManager) {
		this.authenticationManager = authenticationManager;

		setFilterProcessesUrl(SecurityConstants.AUTH_LOGIN_URL);
		setRequiresAuthenticationRequestMatcher(new AntPathRequestMatcher(SecurityConstants.AUTH_LOGIN_URL,"GET"));
	}

	@Override
	public Authentication attemptAuthentication(HttpServletRequest request, HttpServletResponse response) {

		String username = request.getParameter("username");
		String password = request.getParameter("password");
		UsernamePasswordAuthenticationToken authenticationToken = new UsernamePasswordAuthenticationToken(username,
				password);
		System.out.println();
		return authenticationManager.authenticate(authenticationToken);
	}

	@Override
	protected void unsuccessfulAuthentication(HttpServletRequest request, HttpServletResponse response,
			AuthenticationException failed) throws IOException {

		PrintWriter out = response.getWriter();
		response.setContentType("application/json");
		response.setCharacterEncoding("UTF-8");

		out.print(String.format("{ \"token\": \"\", \"success\" : %s, \"user\": \"\"}", "false"));
		out.flush();
	}

	@Override
	protected void successfulAuthentication(HttpServletRequest request, HttpServletResponse response,
			FilterChain filterChain, Authentication authentication) throws IOException {

		List<String> roles = authentication.getAuthorities().stream().map(GrantedAuthority::getAuthority)
				.collect(Collectors.toList());

		String token = getJWTToken(authentication.getName(), roles);

		PrintWriter out = response.getWriter();
		response.setContentType("application/json");
		response.setCharacterEncoding("UTF-8");
		out.print(String.format("{ \"token\": \"%s\", \"success\" : %s, \"user\" : \"%s\"}", token, "true",
				authentication.getName()));
		out.flush();
	}

	public static String getJWTToken(String username, List<String> roles) {
		byte[] signingKey = SecurityConstants.JWT_SECRET.getBytes();

		String token = Jwts.builder().signWith(Keys.hmacShaKeyFor(signingKey), SignatureAlgorithm.HS512)
				.setHeaderParam("typ", SecurityConstants.TOKEN_TYPE).setIssuer(SecurityConstants.TOKEN_ISSUER)
				.setAudience(SecurityConstants.TOKEN_AUDIENCE).setSubject(username)
				.setExpiration(new Date(System.currentTimeMillis() + 864000000)).claim("rol", roles).compact();

		return token;
	}
}
The second filter filters every request but the ones we explicitly excluded (POST on /account) in the SecurityConfiguration and checks if they contain a header with a valid JWT token. If the request passes the filter, it moves on to the REST Controller. Otherwise a 403 Forbidden response code is returned.
public class JwtAuthorizationFilter extends BasicAuthenticationFilter{

	private static final Logger log = LoggerFactory.getLogger(JwtAuthorizationFilter.class);

	public JwtAuthorizationFilter(AuthenticationManager authenticationManager) {
		super(authenticationManager);
	}

	@Override
	protected void doFilterInternal(HttpServletRequest request, HttpServletResponse response, FilterChain filterChain)
			throws IOException, ServletException {

		Authentication authentication = getAuthentication(request);
		if (authentication == null) {
			filterChain.doFilter(request, response);
			return;
		}

		SecurityContextHolder.getContext().setAuthentication(authentication);
		filterChain.doFilter(request, response);
	}

	private UsernamePasswordAuthenticationToken getAuthentication(HttpServletRequest request) {
		String token = request.getHeader(SecurityConstants.TOKEN_HEADER);
		if ((token != null && token != "") && token.startsWith(SecurityConstants.TOKEN_PREFIX)) {
			try {

				byte[] signingKey = SecurityConstants.JWT_SECRET.getBytes();

				Jws<Claims> parsedToken = Jwts.parser().setSigningKey(signingKey)
						.parseClaimsJws(token.replace("Bearer ", ""));

				String username = parsedToken.getBody().getSubject();

				List<SimpleGrantedAuthority> authorities = ((List<?>) parsedToken.getBody().get("rol")).stream()
						.map(authority -> new SimpleGrantedAuthority((String) authority)).collect(Collectors.toList());

				if ((username != null && username != "")) {
					return new UsernamePasswordAuthenticationToken(username, null, authorities);
				}
			} catch (ExpiredJwtException exception) {
				log.warn("Request to parse expired JWT : {} failed : {}", token, exception.getMessage());
			} catch (UnsupportedJwtException exception) {
				log.warn("Request to parse unsupported JWT : {} failed : {}", token, exception.getMessage());
			} catch (MalformedJwtException exception) {
				log.warn("Request to parse invalid JWT : {} failed : {}", token, exception.getMessage());
			} catch (SignatureException exception) {
				log.warn("Request to parse JWT with invalid signature : {} failed : {}", token, exception.getMessage());
			} catch (IllegalArgumentException exception) {
				log.warn("Request to parse empty or null JWT : {} failed : {}", token, exception.getMessage());
			}
		}

		return null;
	}
}
Note, that we do not have to call all those methods ourselves, instead
we just provide the implementations of what we want to happen if a user
attempts to authenticate, for example. Usually we just have to return null, if we want the authentication to fail. Spring then acts accordingly and calls the unsuccessfulAuthentication()
method we implemented. Furthermore, we almost at all times have the
possibility to interact with the request and the response in order to
get or set headers as well as status codes, for example.
Step 5: Hashing the password
Now that we can create and authorize users, we need to address some
security concerns: As you may already have noticed, we are storing all
of our users data in plain text, even the passwords. What we really want
is to only store a hash of the password. Fortunately, we can use Spring
Security’s built in BCryptPasswordEncoder for this purpose. All we have to do is modify the MovieUser class a little, so if a password is set, it gets hashed automatically. In addition, we provide a matchPassword() method, to determin if a password matches the stored hash.
@Entity
public class MovieUserBlog {
	@Column(name = "username", unique = true, nullable = false)
	private String username;

	@Column(name = "password")
	private String password;

	@Id
	@GeneratedValue(strategy = GenerationType.IDENTITY)
	private Long id;

	public MovieUserBlog() {

	}

	public MovieUserBlog(String username, String password) {
		setUsername(username);
		setPassword(password);
	}

	public String getUsername() {
		return username;
	}

	public void setUsername(String username) {
		this.username = username;
	}

	// now lets hash the password before setting it
	public void setPassword(String password) {
		BCryptPasswordEncoder encoder = new BCryptPasswordEncoder(); // default strength=10
		this.password = encoder.encode(password);
	}

	public boolean matchPassword(String rawPassword) {
		BCryptPasswordEncoder encoder = new BCryptPasswordEncoder();
		return encoder.matches(rawPassword, password);
	}

	// let's not have a setter for id, as it is auto generated

	public Long getId() {
		return id;
	}
}
In order for our authentication to work with the hashed passwords, we need to modify the CustomAuthenticationProvider class as well, so it uses the newly implemented matchPassword() method.
@Component
public class CustomAuthenticationProvider implements AuthenticationProvider {

	@Autowired
	private MovieUserBlogService movieUserBlogService;

	@Override
	public Authentication authenticate(Authentication authentication) throws AuthenticationException {
		String username = authentication.getName();
		String password = authentication.getCredentials() == null ? null : authentication.getCredentials().toString();

		if(username == null || password == null) {
			return null;
		}

		try {
			MovieUserBlog user = movieUserBlogService.getMovieUserBlogByUsername(username);
			if(user.matchPassword(password)) {
				return new UsernamePasswordAuthenticationToken(username,
						password, new ArrayList<>());
			}
		} catch(Exception e) {
			// user does not exist in db
		}
		return null;
	}

	@Override
	public boolean supports(Class<?> authentication) {
		return authentication.equals(UsernamePasswordAuthenticationToken.class);
	}

}
Now that you know the basics of building a RESTful API with Spring you can get creative yourself and extend the examples above to fit your needs. Once you’re happy with your implementation we can move on to building the frontend of our application.
Writing the Frontend using Angular
Once the REST API is in place we can start to write our frontend.
Setup
First we need to install the angular CLI.
$ npm install -g @angular/cli
Then we can generate a template for our project
$ ng new movie-client
The CLI will ask you a few questions. Say yes to angular routing and pick your style sheet format of choice.
Once it’s done generating you can try to run it$ cd movie-client
$ ng serve
If you navigate to http://localhost:4200/ you should now see your app running.
Getting Started
To avoid having to write a lot of CSS ourselves we’ll use Bootstrap. Open your index.html file located at movie-client/src/index.html and add the following lines inside the <head>tags. They will load Bootstrap and jQuery.
<script src="https://code.jquery.com/jquery-3.3.1.slim.min.js" integrity="sha384-q8i/X+965DzO0rT7abK41JStQIAqVgRVzpbzo5smXKp4YfRvH+8abtTE1Pi6jizo" crossorigin="anonymous"></script>
<script src="https://stackpath.bootstrapcdn.com/bootstrap/4.3.1/js/bootstrap.min.js" integrity="sha384-JjSmVgyd0p3pXB1rRibZUAYoIIy6OrQ6VrjIEaFf/nJGzIxFDsf4x0xIM+B07jRM" crossorigin="anonymous"></script>
<link rel="stylesheet" href="https://stackpath.bootstrapcdn.com/bootstrap/4.3.1/css/bootstrap.min.css" integrity="sha384-ggOyR0iXCbMQv3Xipma34MD+dH/1fQ784/j6cY/iJTQUOhcWr7x9JvoRxT2MZw1T" crossorigin="anonymous">
Next we’ll change the root component HTML template located at movie-client/src/app/app.component.html. All our future pages will be nested inside this template so we can add the elements all our pages should have in common, in this case a simple navbar.
<nav class="navbar navbar-expand-lg navbar-dark bg-dark">
    <button class="navbar-toggler" type="button" data-toggle="collapse" data-target="#navbarSupportedContent"
        aria-controls="navbarSupportedContent" aria-expanded="false" aria-label="Toggle navigation">
        <span class="navbar-toggler-icon"></span>
    </button>
    <div class="collapse navbar-collapse" id="navbarSupportedContent">
        <ul class="navbar-nav">
            <li class="navbar-item active">
                <a class="nav-link" [routerLink]="['/']">Home</a>
            </li>
            <li class="nav-item">
                <a class="nav-link" routerLink="login">Sign in</a>
            </li>
        </ul>
    </div>
</nav>
<router-outlet></router-outlet>
We’ll also add a global rule to get a red background, to do this open your global style sheet at movie-client/src/style.scss and add this rule
body{
background-color: #a83030;
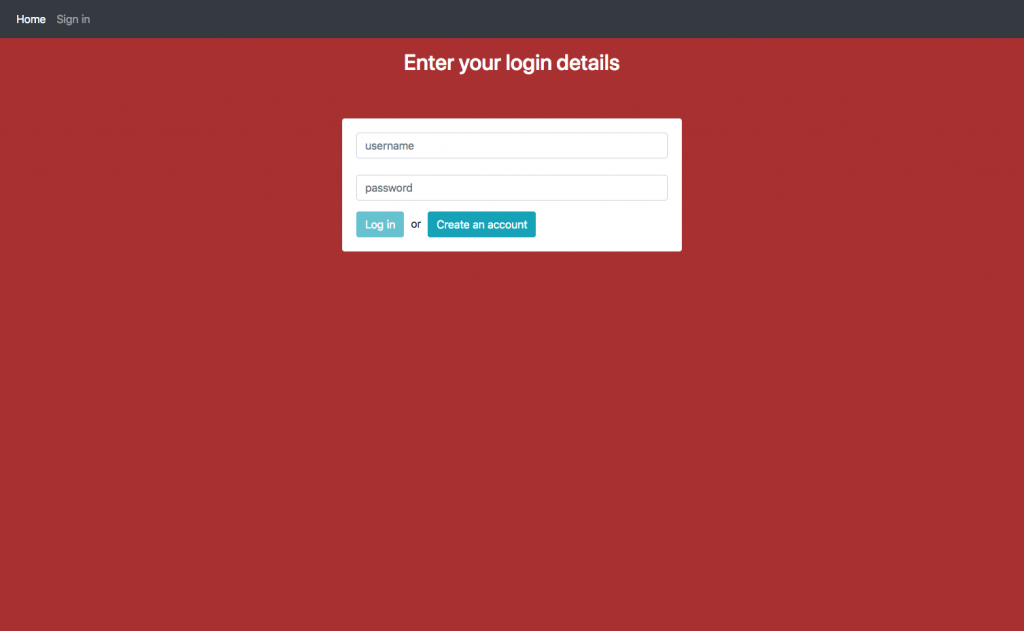
}If you refresh your website now it should look like this.
If you click on the links in the navbar you’ll only get an error in the console since we don’t have any routes defined yet, but we’ll get to that next.
Our first Page
Next we want a way to log in, but to do that we need to talk to our API. For that purpose we’ll generate a service.
In Angular Services are used for tasks like fetching or processing data that will get used by different components.
The Angular CLI can generate a service template for us like this.$ ng generate service backend
This will add two files to you src/app directory, for now we only care about backend.service.ts
Initially we need two functions, signup() to create an account, and authenticate() to get a JWT token.
import { Injectable } from '@angular/core';
import { HttpClient, HttpHeaders } from '@angular/common/http';
import { Observable } from 'rxjs';

@Injectable({
    providedIn: 'root'
})
export class BackendService {

    constructor(private http: HttpClient) { }

    // modify this so it points to your API
    public endpoint = 'http://localhost:8080/';

    public signup(username: string, password: string): Observable<LoginResponse> {
        const sighnupPath = 'account';
        const headers = new HttpHeaders({
            'Content-Type': 'application/x-www-form-urlencoded',
        });
        const options = { headers };
        return this.http.post<LoginResponse>(this.endpoint + sighnupPath, `username=${username}&password=${password}`, options);
    }

    public authenticate(username: string, password: string): Observable<LoginResponse> {
        const loginPath = 'account/token';
        const headers = new HttpHeaders({
            'Content-Type': 'application/x-www-form-urlencoded',
        });
        const options = { headers };
        return this.http.get<LoginResponse>(this.endpoint + loginPath + `?username=${username}&password=${password}`, options);
    }
}
For this to work we need to model LoginResponse. Generate a template for it with$ ng generate class LoginResponse
and edit login-response.ts to fit the data you get from your API.
export class LoginResponse {
    constructor(
        public token: string,
        public success: boolean,
        public user: string
    ) { }
}
Now we can import it in our backend service
import { LoginResponse } from './login-response';With that done we can write our login page. Start by generating a component for it.$ ng generate component login
To remember JWT tokens we will store them as a cookie, to deal with that we need to install a service.$ npm install ngx-cookie-service --save
To be able to use it we need to add it to the providers in app.mopdule.ts. Also add HttpClientModule and FormsModule to imports since we will need them for our login page.
import { BrowserModule } from '@angular/platform-browser';
import { NgModule } from '@angular/core';
import { FormsModule } from '@angular/forms';

import { AppRoutingModule } from './app-routing.module';
import { AppComponent } from './app.component';
import { LoginComponent } from './login/login.component';
import { CookieService } from 'ngx-cookie-service';
import { HttpClientModule } from '@angular/common/http';

@NgModule({
  declarations: [
    AppComponent,
    LoginComponent
  ],
  imports: [
    BrowserModule,
    FormsModule,
    HttpClientModule,
    AppRoutingModule
  ],
  providers: [CookieService],
  bootstrap: [AppComponent]
})
export class AppModule { }
Now we can edit our login component template. Open login.component.html and add a form with fields for username and password and two buttons, one to submit the form and one to navigate to a sign-up page. This template will be inserted at the <router-outlet> tags in the root template.
<h2 class="text-center text-white py-3">Enter your login details</h2>
<div class="card my-5">
    <div class="card-body">
        <form (ngSubmit)="onSubmit()" #userForm="ngForm">
            <div class="form-group">
                <input type="text" [(ngModel)]="username" class="form-control" id="username" name="username"
                    placeholder="username" required #query="ngModel" required pattern="\w{3,40}">
                <br>
                <input type="password" [(ngModel)]="password" class="form-control" id="pwInput" name="password"
                    placeholder="password" required #query="ngModel">
                <div *ngIf="loginFailed==true" class="form-control mt-4 text-danger">{{failedMsg}}</div>
            </div>
            <button type="submit" [disabled]="!userForm.form.valid" id="loginButton" class="btn btn-info">Log
                in</button>
            <span class="or">or</span>
            <button type="button" class="btn btn-info" id="createAccountButton" [routerLink]="['/signup']">Create an
                account</button>
        </form>
    </div>
</div>
With the HTML template done we need to write the corresponding code in login.component.ts. The onSubmit() function gets called when we click the submit button, username and password get set by the form, and failedMsg is displayed if the login fails.
import { Component, OnInit } from '@angular/core';
import { Router } from '@angular/router';
import { BackendService } from '../backend.service';
import { CookieService } from 'ngx-cookie-service';

@Component({
    selector: 'app-login',
    templateUrl: './login.component.html',
    styleUrls: ['./login.component.scss']
})
export class LoginComponent implements OnInit {

    username: string;
    password: string;

    loginFailed = false;
    failedMsg = '';

    constructor(private router: Router, private backendService: BackendService, private cookieService: CookieService) { }


    ngOnInit() {
        // navigate to the root if we already have a token set (are logged in)
        if (this.cookieService.check('token')) {
            this.router.navigate(['/']);
        }
    }

    onSubmit() {
        this.backendService.authenticate(this.username, this.password).subscribe(response => {
            if (response.success) {
                this.cookieService.set('username', response.user, 365, '/');
                this.cookieService.set('token', response.token, 365, '/');
                this.router.navigate(['/']);
            }
        }, error => {
            this.loginFailed = true;
            if (error.status === 503) {
                this.failedMsg = 'Too many failed attempts. Try again in a few minutes.';
            } else {
                this.failedMsg = 'Login failed!';
            }
        });
    }
}
Finally we need to hook this component up to our router. To do that open app-routing.module.ts and add login to your routes like this
const routes: Routes = [
    { path: 'login', component: LoginComponent },
];
If you navigate to http://localhost:4200/login now you will see the page we just created. You will notice the page looks a bit wonky, but we can easily fix that with a bit of CSS. Add these rules to login.component.scss and it should look much better.
.card {
    margin: auto;
    max-width: 500px;
}

.text-danger {
    background-color: rgb(230, 165, 165);
}
.btn {
    margin-right: 10px;
}

.or {
    margin-right: 10px;
}
Improving the Navbar
Next we’ll change the navbar in the root component to take advantage of our new login cookie.
Open app.component.ts and add a constructor as well as loggedIn() and logOut() functios.
import { Component } from '@angular/core';
import { CookieService } from 'ngx-cookie-service';
import { BackendService } from './backend.service';
import { Router, ActivatedRoute, NavigationEnd } from '@angular/router';

@Component({
    selector: 'app-root',
    templateUrl: './app.component.html',
    styleUrls: ['./app.component.scss']
})
export class AppComponent {
    title = 'tutorial-client';

    constructor(private route: ActivatedRoute, private router: Router,
                private backendService: BackendService, public cookieService: CookieService) {
        // listen to every routing event and redirect the route to login if the user is not logged in (or trying to sign up)
        this.router.events.subscribe(event => {
            if (event instanceof NavigationEnd && !this.loggedIn() && event.url !== '/signup') {
                this.router.navigate(['/login']);
            }
        });
    }

    loggedIn(): boolean {
        return (this.cookieService.check('token') && this.cookieService.get('token').length > 0);
    }

    logOut() {
        this.cookieService.delete('username', '/');
        this.cookieService.delete('token', '/');
        this.router.navigate(['/login']);
    }
}
Equipped with these functions we can update our navbar to allow the user to log out. Remove the static link to login and replace it with a conditional element. It will show the link to login if the user is not logged in, and otherwise a drop-down with multiple options.
<span *ngIf="loggedIn(); then thenBlock else elseBlock"></span>
<ng-template #thenBlock>
<li class="nav-item dropdown">
<a class="nav-link dropdown-toggle" href="#" id="navbarDropdown" role="button"
data-toggle="dropdown" aria-haspopup="true" aria-expanded="false">
{{cookieService.get('username')}}
</a>
<div class="dropdown-menu" id="dropdown" aria-labelledby="navbarDropdown">
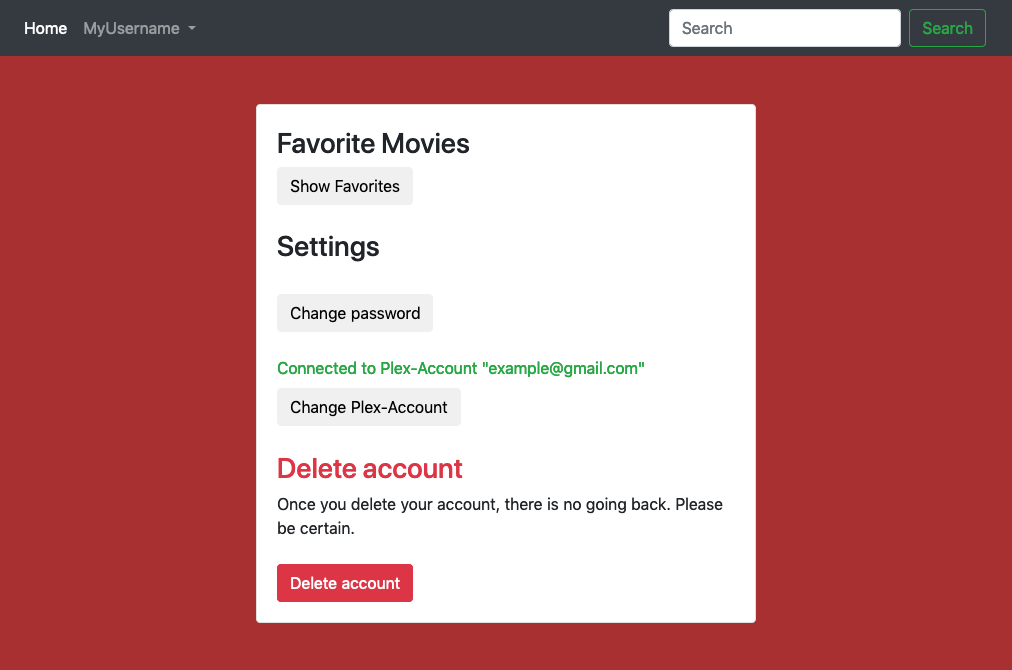
<a class="dropdown-item" id="dropdownProfile" routerLink="profile">Profile</a>
<a class="dropdown-item" id="dropdownFavorites" routerLink="favorites">Favorites</a>
<div class="dropdown-divider"></div>
<a class="dropdown-item cursor-pointer" (click)="logOut()">Logout</a>
</div>
</li>
</ng-template>
<ng-template #elseBlock>
<li class="nav-item">
<a class="nav-link" routerLink="login">Sign in</a>
</li>
</ng-template>
Right now only the logout() button works, but we can implement the other pages later.

Now you can try to write a sign-up page on your own. Just repeat the steps we used to create the login page, but use backendService.signup() instead of backendService.authenticate() and adjust the html template a bit.
Loading and displaying Movies
All of the work we’ve done so far was only housekeeping. Now we can start to load actual content from our API.
First let’s get popular movies and display them on our currently empty homepage. To accomplish this we need to implement a few models from our API as classes, generate two components and add a function to our BackendService.
Let’s start by generation the component that will be our homepage$ ng generate component homepage
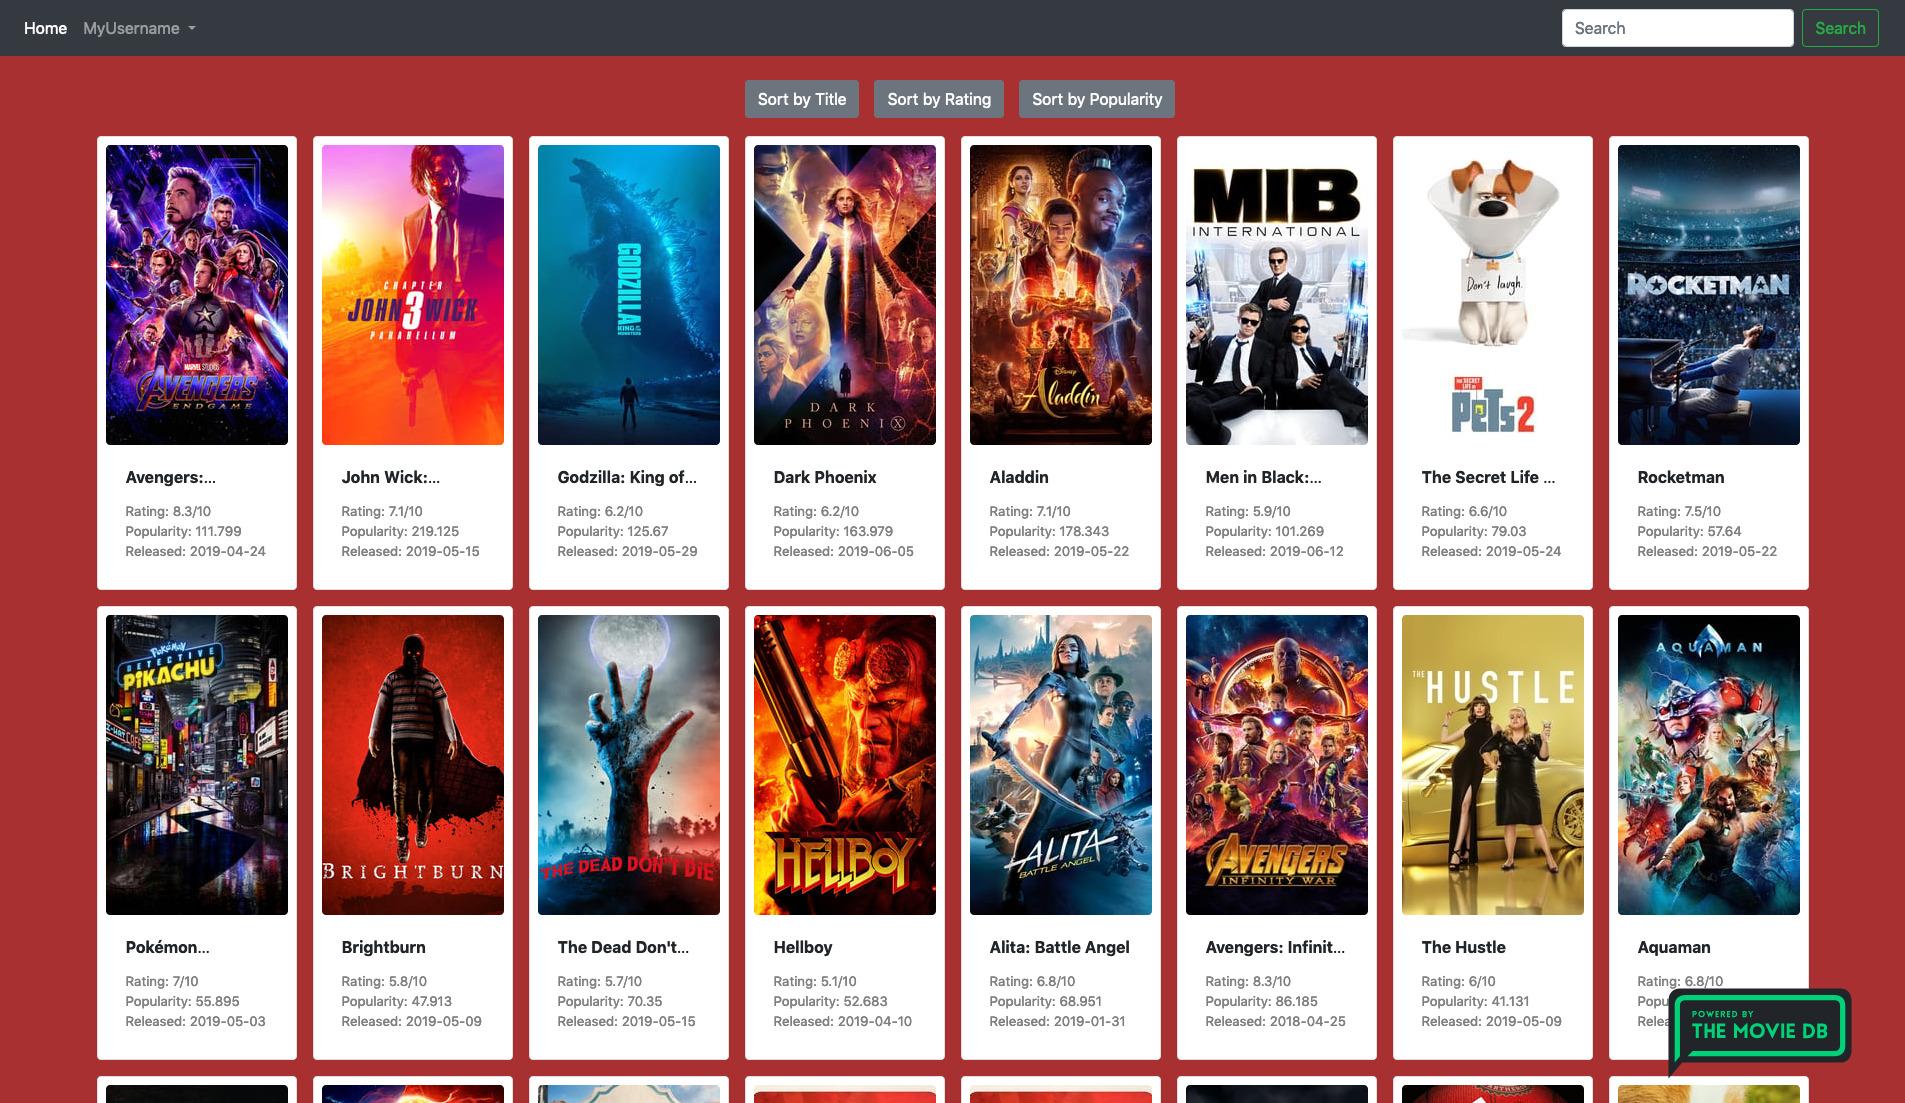
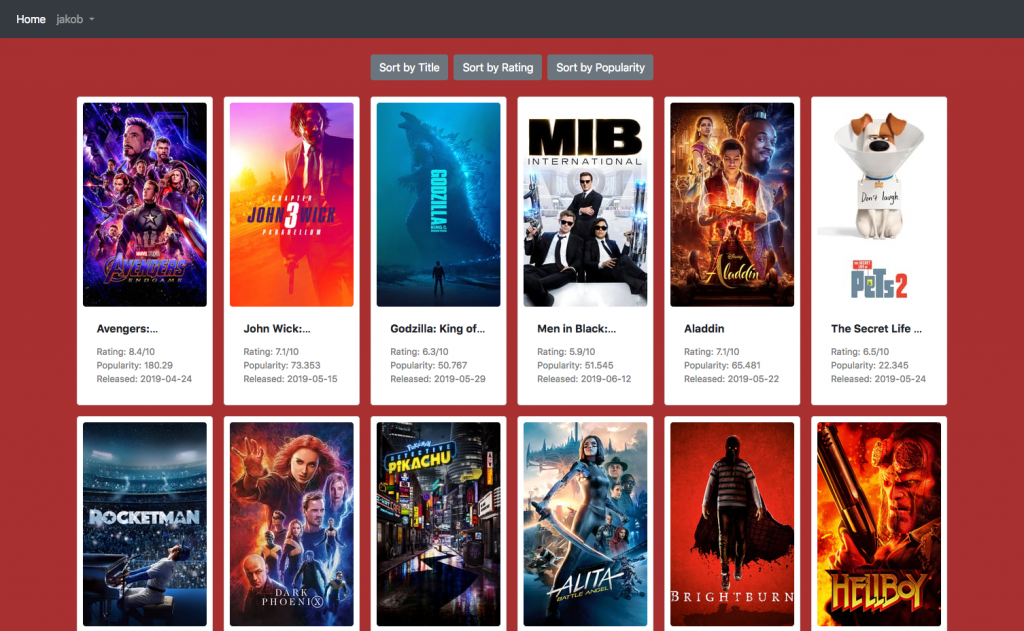
The HTML template for this component is very simple. Just three buttons to sort the loaded movies. The movies themselves will be in the MovieGrid subcomponent.
<div class="container mt-4">
    <div class="row justify-content-center mb-3">
        <button class="btn btn-secondary mr-2" (click)="sortTitle()">Sort by Title</button>
        <button class="btn btn-secondary mr-2" (click)="sortRating()">Sort by Rating</button>
        <button class="btn btn-secondary" (click)="sortPopularity()">Sort by Popularity</button>
    </div>
    <app-movie-grid [movieList]="movies"></app-movie-grid>
</div>
homepage.component.ts isn’t much more complicated. We load some movies with the help of our BackendService and declare a few functions to sort them.
import { Component, OnInit } from '@angular/core';
import { BackendService } from '../backend.service';
import { Search } from '../search';
import { Movie } from '../movie';

@Component({
    selector: 'app-homepage',
    templateUrl: './homepage.component.html',
    styleUrls: ['./homepage.component.scss']
})
export class HomepageComponent implements OnInit {

    private trendingResult: Search;
    movies: Movie[] = [];

    private titleOrder = false;
    private ratingOrder = false;
    private popularityOrder = false;

    constructor(private backendService: BackendService) { }

    ngOnInit() {
        this.backendService.getTrending().subscribe(data => {
            this.trendingResult = data;
            this.movies = this.movies.concat(data.results);
        });
    }

    sortTitle() {
        this.titleOrder = !this.titleOrder;
        this.movies.sort((a, b) => {
            return this.sort(a.title, b.title, this.titleOrder);
        });
    }

    sortRating() {
        this.ratingOrder = !this.ratingOrder;
        this.movies.sort((a, b) => {
            return this.sort(a.vote_average, b.vote_average, this.ratingOrder);
        });
    }

    sortPopularity() {
        this.popularityOrder = !this.popularityOrder;
        this.movies.sort((a, b) => {
            return this.sort(a.popularity, b.popularity, this.popularityOrder);
        });
    }

    sort(a: any, b: any, ascending: boolean): number {
        if (a < b) {
            if (ascending) { return -1; } else { return 1; }
        } else if (a > b) {
            if (ascending) { return 1; } else { return -1; }
        }
        return 0;
    }
}
We will also need to implement getTrending() in our BackendService
getTrending(page?: number) {
    if (!page) {
        page = 1;
    }
    const requestString = `movies/trending?page=${page}`;
    let headers = new HttpHeaders();
    headers = headers.append('Authorization', 'Bearer ' + this.cookieService.get('token'));
    return this.http.get<Search>(this.endpoint + requestString, { headers });
}
and write classes for Search and Movie$ ng generate class Search$ ng generate class Movie
Search should look like this
import { Movie } from './movie';

export class Search {
    constructor(
        public page: number,
        public results: Movie[],
        public total_results: number,
        public total_pages: number
    ) { }
}
and Movie like this
export class Movie {
    constructor(
        public adult: boolean,
        public poster_path: string,
        public overview: string,
        public release_date: string,
        public genre_ids: number[],
        public id: number,
        public original_title: string,
        public origina_language: string,
        public title: string,
        public backdrop_path: string,
        public popularity: number,
        public vote_count: number,
        public video: boolean,
        public vote_average: number
    ) { }
}
To complete our homepage we need the MovieGrid component. It does exactly what it says on the tin, display movies as a grid.$ ng generate component MovieGrid
This is the html template for it. ngFor iterates over a list of movies and repeats for every item.
<div class="justify-content-center row d-flex">
    <a *ngFor="let movie of movieList" routerLink="/movie/{{movie.id}}" routerLinkActive="active" width="200px">
        <div class="card-inner card p-2 m-2">
            <img src="https://image.tmdb.org/t/p/w200{{movie?.poster_path}}"
                onError="this.src='https://via.placeholder.com/200x300.png?text=No+Poster+found'"
                class="rounded card-img-top" id="poster">
            <div class="card-body">
                <div class="card-title crop-text-1"><strong>{{movie.title}}</strong></div>
                <div class="description">Rating: {{ movie.vote_average }}/10</div>
                <div class="description">Popularity: {{ movie.popularity }}</div>
                <div class="description">Released: {{ movie.release_date }}</div>
            </div>
        </div>
    </a>
</div>
We also need to add an input decorator to the .ts file so we can get the movies from the parent component.
import { Component, Input } from '@angular/core';
import { Movie } from '../movie';

@Component({
    selector: 'app-movie-grid',
    templateUrl: './movie-grid.component.html',
    styleUrls: ['./movie-grid.component.scss']
})
export class MovieGridComponent {
    @Input() movieList: Movie[];
    constructor() { }

}
Finally we just need to add an entry for HomepageComponent to our app-routing.module.ts routes array.
{ path: '', component: HomepageComponent }Now we can see a grid of movies on our homepage if we are logged in, but the styling needs some polishing. The following is my SCSS for MovieGrid
.card-text{
    word-wrap: break-word;
}

.card-inner {
    width: 200px;
    overflow: auto;
}

.description {
    color: grey;
    font-size: 10pt;
}

#poster {
    height: 300px;
    overflow: hidden;
    object-fit: cover;
}

.crop-text-1 {
    -webkit-line-clamp: 1;
    overflow : hidden;
    text-overflow: ellipsis;
    display: -webkit-box;
    -webkit-box-orient: vertical;
}
and we can also add these rules to our global styles.scss
a, a:hover {
    text-decoration: none;
    color: inherit;
}

.container {
    max-width: 100%;
}
Adding Search to the Navbar
The next step will be to add search functionality to our website. To do this we can modify the navbar again.
Add this inline form to app.component.html just before the <nav> tag closes.
<form class="form-inline my-2 my-lg-0" (ngSubmit)="onSubmit()">
    <input focusFirst type="text" [(ngModel)]="searchQuery" class="form-control mr-sm-2" id="query" name="query" type="search" placeholder="Search" aria-label="search input">
    <button class="btn btn-outline-success my-2 my-sm-0" type="submit" id="search-btn">Search</button>
</form>
Then we need a package to base64 encode search strings so we can use them in URLs.
$ npm install --save js-base64
$ npm install --save @types/js-base64
Add the function onSubmit() that gets called when we click search and an import statement for -js-base64 to app.component.ts.
import { Base64 } from 'js-base64';

[...]

onSubmit() {
    if (this.searchQuery.length > 0) {
        this.router.navigate(['search/' + Base64.encode(this.searchQuery)]);
    }
}
As you can see this navigates the user to a search page.
You should now be able to implement the search page on your own just like our homepage.
Generate a component for it and add it to the router like this
{ path: 'search/:query', component: SearchComponent }To get the search string from the URL and execute the search you can use this function that gets called when the page loads.
ngOnInit() {
    this.route.params.subscribe(
        params => {
            this.query = Base64.decode(params['query']);
            this.titleService.setTitle(`Search: ${this.query}`);
            if (this.query) {
                this.apiService.searchMovies(this.query).subscribe(data => {
                    this.searchResult = data;
                    this.movies = data.results;
                });
            }
        });
}
Finishing the Website
You have probably already noticed that we have lots of links that lead nowhere. With all the major building blocks in place and you can now start adding pages on your own to finish the website.
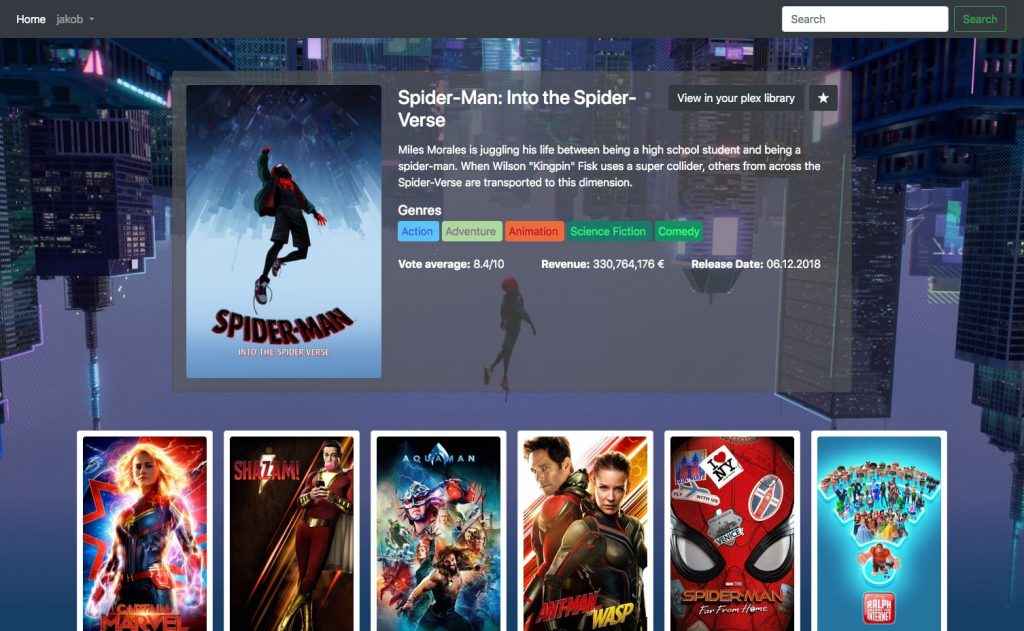
For example here is a MovieDetails page we implemented.
Docker
To simplify deployment we will run our servers in docker containers. If you’re not familiar with docker yet, you can get up to speed with this workshop.
Frontend
Create a Dockerfile in the root of your angular project. We will create an image using docker’s multistage build functionality
### STAGE 1: Build ###
FROM node:alpine as builder

COPY package.json package-lock.json ./

RUN npm ci && mkdir /ng-app && mv ./node_modules ./ng-app
WORKDIR /ng-app

COPY . .

RUN npm run ng build -- --prod --output-path=dist


### STAGE 2: Setup ###
FROM nginx:stable-alpine

COPY nginx/default.conf /etc/nginx/conf.d/

RUN rm -rf /usr/share/nginx/html/*

COPY --from=builder /ng-app/dist /usr/share/nginx/html

CMD ["nginx", "-g", "daemon off;"]
That’s it, now you can build and run it it
$ docker build -t "container-name" .
$ docker run -p 8080:80 .
Backend
First we build our server manually$ mvn package
then we can use the resulting jar in our Dockerfile
FROM openjdk:8-jdk-alpine
VOLUME /tmp
COPY src/main/resources/public/* \ /src/main/resources/public/
COPY target/* \ /target/
ENTRYPOINT ["java","-Djava.security.egd=file:/dev/./urandom","-jar","/target/your-jar-name-here.jar"]
You can use the same commands as before to build and run the image, but make sure to change the ports you use.
Docker Compose
Now that we have those images we can run them with Docker Compose. create a docker-compose.yaml file and add your images as services.
version: "3.7"

services:
  movie-server:
    image: your-image-name1
    container_name: movie-server
    restart: always
    ports:
     - "8080:8080"

  movie-client:
    image: your-image-name2
    container_name: movie-client
    restart: always
    depends_on:
     - movie-server
    ports:
     - "8081:80"
This allows you to start both services with just one command.$ docker-compose up
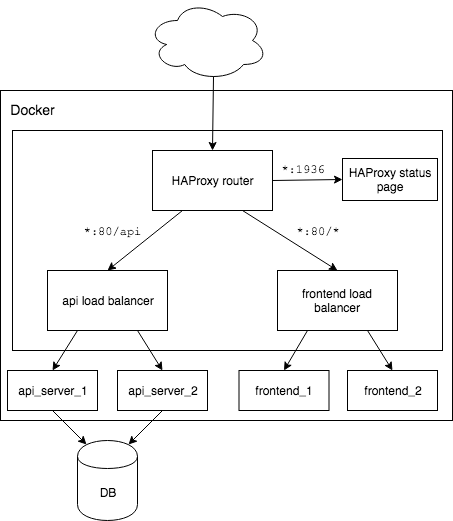
HAProxy
HAProxy is a powerful reverse proxy that we can use to route incoming traffic to our frontend or API servers respectively. Additionally it enables us to run multiple instances of our services and manages the load balancing between them for us.
Here is a diagram of the end result we are looking for.
We need a haproxy.cfg to get HAProxy running
# some global settings
global
        daemon
        log stdout format raw local0 debug
        maxconn 1000 # only 1000 requests to be processed simultaneously

defaults
        mode http
        log global
        option httplog
        timeout connect 5s
        timeout client  50s
        timeout server  50s
        default-server init-addr none # this allows haproxy to start with unresolved dns entries

resolvers docker_resolver
        nameserver dns 127.0.0.11:53 # instruct haproxy to use the docker name resolver

# this is for the HAProxy status page
listen stats
        bind :1936
        stats refresh 10s
        mode http
        stats enable
        stats realm Haproxy\ Statistics
        stats uri /

backend api_server
        reqrep ^([^\ ]*)\ /api/(.*)     \1\ /\2     # remove '/api/'from the url
        balance roundrobin
        option httpchk GET /ping                    # the path that should be used for status checks
        option forwardfor except 127.0.0.1
        # our two instances of the REST API server
        # make sure the port is correct and the hostname is the same as the docker container name
        server api1 movie-server1:8081 check inter 1s resolvers docker_resolver resolve-prefer ipv4
        server api2 movie-server2:8081 check inter 1s resolvers docker_resolver resolve-prefer ipv4

backend client
        balance roundrobin
        option httpchk GET /
        option forwardfor except 127.0.0.1
        server frontend1 movie-client1:80 check inter 1s resolvers docker_resolver resolve-prefer ipv4
        server frontend2 movie-client2:80 check inter 1s resolvers docker_resolver resolve-prefer ipv4

frontend main
        mode    http
        # listen at port 80
        bind    *:80

        # route traffic to the api_server if the path begins with '/api'
        acl path_1 path_beg /api
        use_backend api_server if path_1

        default_backend client
Save the config file in a new folder called proxy and then we can add HAProxy to our docker-compose.yml file.
We simply need to add the following service.
  proxy:
    image: haproxy:1.9
    container_name: proxy
    ports:
     - "80:80"
     - "1936:1936"
    volumes:
     - ./proxy:/usr/local/etc/haproxy:ro
    restart: always
Then adjust the existing services we created earlier. They now need a link to and depend on the proxy service. Add two instances of each of movie-server and movie-client.
  movie-server1:
    image: movie_movie-server
    container_name: movie-server1
    restart: always
    links:
      - proxy
    depends_on:
      - proxy
Now we can quickly and easily deploy our application in any environment.
Excellent end-to-end hands-on CRUD web app featuring Docker Compose & HAProxy